
Friday, 5 February 2010
Thursday, 4 February 2010
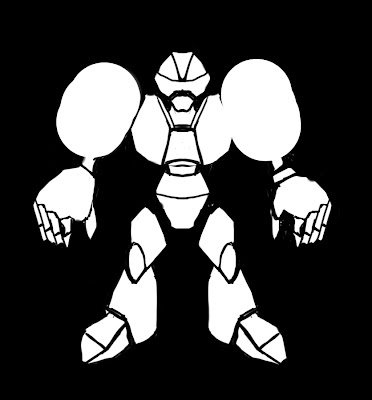
Not so bad ass finished... nearly
I couldn't quite manage to complete the hands of this sculpt to my liking. They took far too long to sculpt and was probably the one component that took the longest to do out all the parts and I still didn't arrive at a conclusion that I was happy with. That's probably why the boot also remains incomplete. It would have been nice to finish both however I am satisfied with the experience I have gained!


Due to the shape of the hand in this design and the fact that I was having no success with sculpting the basic shape I had exported from 3D Studio Max into Mudbox I chose to completely model the hand in 3D Studio Max. This proved to be a problem as can be seen on the renders as the hand doesnt match the style and form of the rest of the action figure. Mudbox isn't able to model hard edges successfully enough! Something which on further investigation zbrush can!


Due to the shape of the hand in this design and the fact that I was having no success with sculpting the basic shape I had exported from 3D Studio Max into Mudbox I chose to completely model the hand in 3D Studio Max. This proved to be a problem as can be seen on the renders as the hand doesnt match the style and form of the rest of the action figure. Mudbox isn't able to model hard edges successfully enough! Something which on further investigation zbrush can!

Bad Ass Finished
The evil action figure is finished. I had severe problems when Boolean Unioning all the components together with computer power! Hence why there are no facial features as I was going to complete them when the meshes were all together. I will sculpt them in by hand once the figure has been 3d Printed.


Wednesday, 3 February 2010
Goodie hand
As I was finding creating the hand in 3ds Max and then importing it into Mudbox a problem, I used a basic cube from Mudboxs standard shapes and then beganb to manipulate it with the sculpting tools. However as can be seen from all the photographs the vertices and poly lines are all out of alignment and even though the meshs were at the same sub division level there was a higher frequency of polygons on one side of the hand to the other. This proved to be a problem as both sides of the hand were behaving differently to one another as I was sculpting.


Tuesday, 2 February 2010
Baddie from standard cube?
I was originally going to sculpt one of the figures traditionally, however I chose to persevere with the digital sculpting process. I chose to sculpt this character from standard shapes offered by Mudbox, in this case a cube. This proved to be a really quick process as it is an organic design. The limitation of Mudbox is that it doesn't
have enough options to specify how many vertices you start with on each face.

have enough options to specify how many vertices you start with on each face.

Wednesday, 27 January 2010
Design Change
I have decided that I prefer this design to the previous design. There are more possibilities for detailing the armour overlapping than previously.

This is the much simplified base mesh from 3D Studio Max, when I increase the polygons in Mudbox the halves are subdivided equally with identical vertices on both sides of the mesh. This allows for symmetrical sculpting and being able to manipulate both sides of the mesh identically.


This is the much simplified base mesh from 3D Studio Max, when I increase the polygons in Mudbox the halves are subdivided equally with identical vertices on both sides of the mesh. This allows for symmetrical sculpting and being able to manipulate both sides of the mesh identically.


Monday, 25 January 2010
3DS Max Mesh Blocking out
To allow the sculpting within Mudbox I have opted to block out the form in 3D Studio Max. On my company visit I was told that Morpheus use a Maya and Zbrush pipeline for the digital sculpting of toys. I do not know either Maya or Zbrush and it would be unrealistic to have to learn both and produce an outcome! I have therefore opted to use 3D Studio Max for my blocking out (as I know how to use it a little bit) and Mudbox for the sculpting as it's really intuitive and easy to pick up! Below you can see my blocking out renders, although they feature no articulation, something which I would like to model in 3D Studio Max before I render it up. I have also found that I don't like the shoulders when I blocked them in 3D so have opted to amend the design!


Friday, 22 January 2010
Design Development
Once I had created the thumbnails I then developed the form in much more detail. I really liked the proportions of the form, I felt that the detail was a little too simple. All the designs below are variations of the design, with more form development to provide more interest and character.


Tuesday, 19 January 2010
Design Silhouettes


Firstly I began working on parts of the toy individually which ensured I had parts which were interchangable with each other and could be used on different parts of the figure. This was not creating a coherant design with character. I amended my design process to creating thumbnail silhouettes which allowed me to generate characters quickly. Below are some of my designs.
I am going to develop the two designs underlined in red further. I am hoping to digitally sculpt them incorporating articulation into the design in such a way that the parts are interchangable with other figures which could be designed and realised later outside this project.
Subscribe to:
Posts (Atom)